My Pins

Showing posts with label cooking. Show all posts

Friday, December 28, 2018

The Birthday Bower


The feasting continued Boxing Day as we celebrated the 100th anniversary of my Nan's birthday and my youngest daughter's birthday. Much of the warm afternoon hours were lazed away under the trees in the cool and the babes dozed at intervals.


There are a couple of dishes for the day that were outstanding that I want to note the recipes for.
The first,

Macadamia, Mango and Haloumi Salad
(This is my recipe for 12 people)

 3 cups of prepared cous cous
700-800g of Halloumi 
300g of macadamias 
3 ripe mangoes
Very large bunch of mint and parsley
Macadamia oil
Salt and pepper

Dice the mangoes, chop the mint and parsley and add to the prepared cous cous.
Slice the halloumi and cook in a med-hot pan then quickly pan roast the macadamias
Cut the halloumi into bite sized pieces and roughly chop the macadamias.
Mix all the ingredients together with a drizzling of macadamia nut oil.

This makes a sweet, nutty, minty dish with a texture explosion of the cous cous and the soft mango with the hard meaty nuts and the chewy almost squeaky fried halloumi.
Visually it is bright and festive too.


The roulade is a bit more fiddly and complicated but Izaac and Camilla volunteered to do this one and equated the process to something a bit like childbirth; a bit complicated with many stages and sweat with a great end result and after about three years the memories fade and you are ready to tackle it again.


We spent a lazy four hours outside under the trees sipping sparkling wine and cutting the beautiful flourless orange cake. It is a Nigella Lawson recipe and a light refreshing morsel after the two days of feasting.


A family game of quoits and a bit more chatting and snoozing...


bowers of roses about our beds...
This one is called "Coral Dreaming"
(The rose in the top picture is called "Dark Desire" and is for making rose petal jam, The rose featured in the middle is the very popular"Pierre de Ronsard") 

Happy Birthday Nan and Emma x

Saturday, December 15, 2018

Beer and Chilli Peanut Brittle


I've started my Christmas cooking this week and the ever popular peanut brittle is a must.
So deliciously moreish I've had it from myself as well as The Shearer!
I first made this in 2015 so here is the recipe again....

I used per batch - 

260g of raw sugar
200g of lager beer
600g of salted peanuts
1/2 teas ground dried chilli

Pre-heat oven to 180C and line two non-stick biscuit trays with baking paper. By all means lightly grease with butter but we only did it with the first lot and kept recycling the peeled off baking paper and it worked fine.
In a medium sized stock pot on medium heat, combine the sugar and beer, stirring gently till the sugar is dissolved.
Add the peanuts and reduce the heat and simmer for about 15mins stirring occasionally. At this point the liquid is quite reduced and thicker, partially absorbed by the nuts and steamed off.
Remove from heat and mix in chilli. (Add a couple of teaspoons of salt too if you are using unsalted nuts.) 
Tip the mixture onto the biscuit trays and place in the oven.
The next step will take approx 15 mins but you do have to watch it to make sure it doesn't burn. If your oven isn't even you may also need to switch trays and shelf positions during cooking. What should happen is that it will self level a bit bubble away turning a bit more toffee. 
Remove from the oven and place on cooling racks to set.
The paper should peel away easily when cold and you'll be able to break the sheet into rough chunks.


Some notes-
This is best made during dry hot days and humidity will definitely have a bearing on the "snap" to the brittle. Likewise store in air tight containers to keep brittle.
If you are making subsequent batches, DO wash you pot and spoon between batches to prevent crystallising the sugar. 


Thursday, March 1, 2018

Help or House Guest


The kitchen is in full swing at our house, late February and March being the busiest time, and any house guests are welcome to pull up a chair, don an apron and select their knife of choice.


We prepped jalapenos and pickled.


Made a simple spinach and cheese filling seasoned with freshly grated nutmeg - oh divine! Rolled pasta sheets and made fettuccine too. 


We have had a pasta maker for years but last weekend at the market we spotted a deluxe pack version of our Atlas machine which included the ravioli roller.
$10 for the lot and used probably once!


With fresh ripe Roma tomatoes avalanching  on the benches, aromatic green basil in abundance and Craig's homemade Parmesan cheese...
Mama Mia!
Be our guest....


Wednesday, June 14, 2017

Quinoa and Black Bean Bake


It's not a great "foodie shot" so please take my word for it, this is delicious and if you are a bit stumped about what to do with quinoa (kee-NOO-ah) here is a good recipe to try. (If you are looking for a good dried bean recipe...also a good one to try!)

I had to buy the quinoa, capsicum, spice and cheese but even so this costed out for us at about $4.25 and would feed 4-6 people.

Quinoa is high in protein and contains iron, calcium and phospherous, B vitamins and vitamin E. 


Quinoa and Black Bean Bake

3/4 cup of white quinoa
1 onion chopped
2 cloves of garlic crushed
2 med carrots chopped
1/2 a red capsicum chopped
approx 400g of prepared black beans*
approx 600g of chopped canned tomatoes
1 cup of water
generous seasoning of salt and pepper
1/2 teas cayenne pepper
1 tabs of smoked paprika
a handful of chopped parsley
grated cheese for the top

Wash the quinoa well to remove saponins and then soak in a bowl well covered with cold water overnight if possible. Rinse and drain. 
Place the quinoa in a saucepan with about twice the amount of water and chopped carrots. Bring to the boil and reduce to a simmer till the quinoa is translucent and looks like it has little sprout tails and the carrot is tender.
In a baking dish, combine all the ingredients except the cheese.
Bake in a moderate oven covered for about 30 mins then remove the cover and top with grated cheese. Cook till melted and golden.

*By "prepared black beans, I mean dried beans soaked overnight and rinsed and cooked till tender or use canned or tinned beans. 
I grow and can my own using a pressure canner.


Sunday, April 30, 2017

The Ultimate Coconut Ice Recipe


This was a firm favourite growing up and I have memories of Mum making this recipe in triple batches and more for Christmas giving and for school fetes. It is not the average run of the mill coconut ice recipe, You'll want to pin this one. I know, because Mum lost the recipe about 30 years ago and it has been the subject of regular hunting ever since. She vaguely recalled the ingredients but not the quantities and every likely book she saw in an op-shop had us checking indexes and suffering endless disappointments. 
At last! The recipe is found. In an old school recipe compilation from her old home town in outback Queensland (with contribution credit to a relative of hers) I give you the ultimate Coconut Ice recipe, that it may never be lost again!
Be warned though, it is seriously divine and you will NOT stop at two pieces....


Creamy Coconut Ice

1lb icing sugar
8oz desiccated coconut
1 teas vanilla
2 egg whites
4 oz butter
pink food colouring

Mix sifted icing sugar and coconut in a bowl. Pour on the slightly beaten egg whites and vanilla.
Melt butter over a gentle heat until barely warm, not hot, test temperature with your finger tips. 
Pour onto the ingredients in the bowl and mix thoroughly.
Press half the mixture into a cake tin 7" square or similar.
Add just a couple of drops of pink colouring to make a pretty colour and press this onto the white layer. Pop into the fridge and allow to get quite cool and set before cutting into squares.

Looks perfectly ducky in cellophane bags tied with ribbon and is much more sumptuous than the usual recipes found in old cook books.

Wednesday, December 21, 2016

Rose Petal Champagne


We're making rose petal champagne for Christmas Day.
It's sitting fermenting in the coolest spot in the house in the main chimney space - what was the original kitchen fireplace. It maintains a nice 19C here year round just about. It's in sterilised plastic drink bottles so they don't explode and I periodically release some of the excess gas when the bottles feel really tight.


I'm sure Heather won't mind me sharing the recipe and I understand that it can be adapted for other ingredients like rhubarb or elderflower or what about pine needle and gorse flower....
Here is Heather's recipe and instructions....

Rose Petal Champagne

You will need: 
5-6 plastic fizzy cordial bottles and lids that are sterilised 
A funnel and a colander  
A very clean plastic bucket 1/3 full of rose flowers and 1 spare bucket 
3 ½ cups of white sugar 
1 whole lemon finely chopped 
125 ml of apple cider vinegar 
Put all the previous ingredients into the bucket and fill it with unchlorinated water and stir well. 
Cover with a finely woven cloth and put into a warm place (above 20C) for 48 hours. 
Scoop out the most of the flowers then place the colander over the spare bucket, line it with the cover cloth and strain the champagne through the cloth. 
Decant into the cordial bottles using the spout.  
Leave about a 3 cm gap at the top of the bottle. 
Store in a cool dark place for 7 days before drinking. 
Chill well before opening!! It has a tendency to shoot out of the bottle! (we keep a jug handy lol). 
The champagne will be very mildly alcoholic at 1 week but will gradually become more so as the sugar converts.

Monday, October 31, 2016

Upon Reflection...


October, be gone with you!
It's been a month of extreme highs and lows.


We started the month of with a party and catered for a beloved aunt's 90th birthday. A wonderful celebration shared with seventy family and friends. Craig closely guards his salt & pepper squid recipe but I swear NEVER again for that size crowd. I think I said that last time we did it. It's a real crowd pleaser and often asked for but if anyone asks ever again, I'm handing them the recipe and they can do that one themselves!
A measure of our love for you dear Mae/Miss Mamie/Nin xxx


We did get a couple strides forward in the garden...


And in the house...


I got to work with some amazing ladies to bring together a High Tea for 100 people with Fashion Parade as a fund raiser for Kidney Health Australia. Not only did we raise funds but the guest speaker from "Donate Life" educated our guests about organ donation and we boosted the profiles of four local small businesses. I would like to thank Wysteria Lane of Longford, Miss Nicola, Blue Illusion and Gazman of Launceston for providing a top notch parade and givig so much of their time and prize donations too. I would also like to thank the models from Sue Rees Modelling who also gave up so much of their time for a good cause.


My heart swells thinking of so much generosity and support.
I don't wish to dwell on the down side but their is a lesson here to be learnt though.
Many of us pooled our resources and loaned fine china and silverware to enhance the high tea experience. Unfortunately some of the precious china went "missing". A set of 6 to be exact. I don'y want to talk about karma because that feels so hollow. Let's just say lesson learnt while we try to swallow down the disappointment.


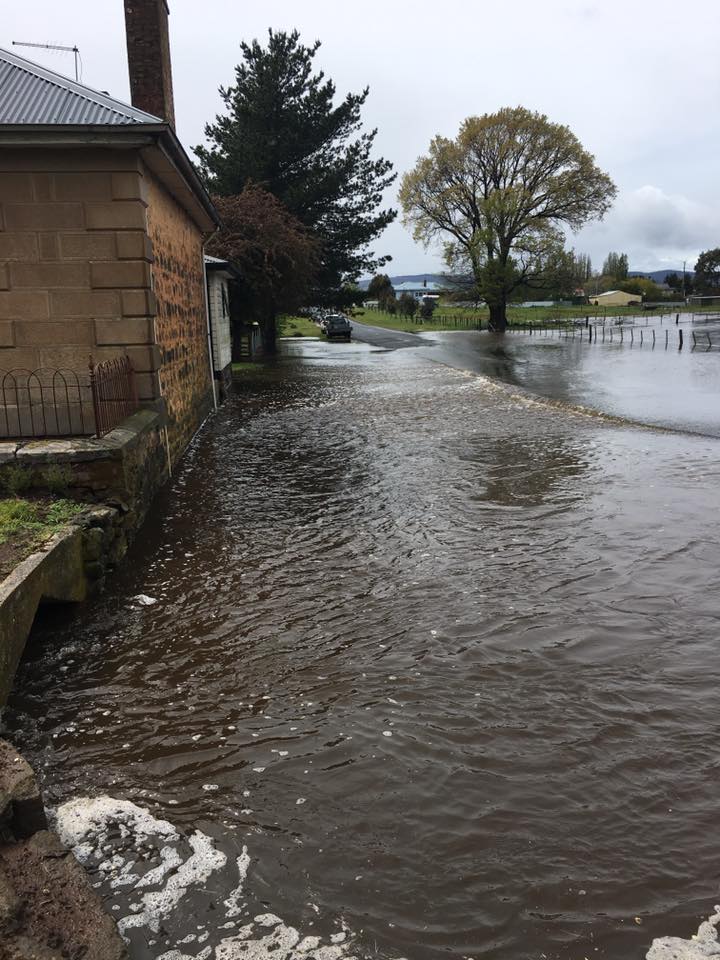
As I left for the Kidney fundraiser that morning, the waters were once again rising after a significant rainfall over night. I phoned the shearer when the event was over bar the shouting to learn things were not good at home. I abandoned the washing up and made haste towards home....
until the engine light came on.
I pulled over and checked the oil of my tired old engine and debated whether to spend precious minutes turning the car out of the wind in order to fill it. Another lesson learned. I gambled and tried to shield the oil stream from gusting winds with my body.
Snort! I'm wide but not that effective as a wind shield. The oil spilled onto the engine and you can guess...
it caught alight.
I carry a pair of pyjama bottoms for a rag so I must have looked a right sight flailing these trying to smother the flames between the radiator and engine. Anyway, long story short, the shearer came to rescue me but it was a sorry sight back at home. 


While it didn't make it all the way into the house, the out buildings were all flooded as the water rose very quickly. Luckily our daughter and SIL were up for the weekend and able to take quick action.


Our losses could have been much greater than our three oldest ladies. Poor girls, the cold water rose so swiftly that by the time they realised the danger and it was up to their belly feathers they weren't able to jump into the trees for shelter. 


Huge thanks also to our neighbours who came swiftly to our aid and got a lot of things to dry land and housed our ride on mower in their garage. Big love.
So October, you've been great, tumultuous and trying, exciting and busy but I'm glad to be moving into November. 

Saturday, October 8, 2016

Hungry Gap - Fennel


The hungry gap is that period between late winter and early spring when you've harvested most everything you've been over-wintering and the new season abundance hasn't kicked in yet.

Fennel planted in mid to late summer can be that fresh burst of flavour that enlivens your plate with exciting flavour and you don't need a lot, just a few sowings will do.


We've been harvesting the fennel over the last four weeks, eating it baked with simple olive oil basting or my favourite way - in salads. I've even been harvesting some of the ferny, feathery tops for a subtle aniseed flavour in omelettes and steamy hot buttery, potatoes.


Sorry, no foodie shots. more of an after thought really.
I love the fennel finely shredded with some finely sliced cabbage and a fruit like; chopped mandarin, sliced orange or finely sliced yellow delicious apple. All these ingredients are seasonally available and at their peak now and they go together so sublimely.
What about some lovely winter Tasmanian walnuts from their shell and lightly roasted with pickings of parsley and mint. Finely shredded "spring" onion (onions plantings not quite ripe and ready in big bulb form) added for a bit of zing.
Simply dressed with Tasmanian olive oil drizzled over with a splash of white wine vinegar or a squeeze of winter abundant lemon juice.


There is nothing nicer at the end of winter than some alive and fresh flavours from the garden. Plan for the hungry gap and feel blessed with abundance all year round.

Sunday, July 24, 2016

Black Currant and Lemon Myrtle Glazed Turkey


It's snowing again, perfect for stay inside and knit days and dinners by candlelight.
The farm where the shearer is working at the moment has a turkey population problem. With the farmers blessing, the men shot one each at the end of their day and thus I share with you a very fragrant, rich recipe for the breast. 


Roasted Turkey Breast with Black Currant & Lemon Myrtle Glaze

1 turkey breast
1 onion chopped
3/4 cup of black currants
1/4 cup molasses 
1/4 cup maple syrup
1/2 cup white wine
1 tsp lemon myrtle leaf powder
1/2 tsp ground cumin
2 tsp of mustard seeds

Pre-heat oven to 160C. I rubbed oil over the entire breast to coat. Place the roughly chopped onion in the bottom of a roasting dish and add a handful of black currants. (I have mine frozen from the summer). Place the turkey breast on top of the onion and currants. 


Place the remaining black currants and all the other ingredients into a small saucepan and heat gently to "pop" the currants so they warm and ooze and make the glaze a lovely baste-able liquid. Brush generously onto the turkey and season with freshly ground black pepper.


Bake in the oven for 1-1 1/2 hours basting a few times during the cooking. When the breast is cooked, remove from heat and rest while you turn the heat back on under the glaze. Add the pan juices in also. Simmer and reduce to a thicker, syrupy, unctuous sauce to spoon over the slices. 

The molasses is smokey and salty-ish and the maple syrup sweet with the tang of the lemon myrtle and fragrant currants and the turkey can really take the robust flavours. The slow roast helps ensure a tender and moist meat.

Friday, July 22, 2016

Date Slice - soooo EASY


I've had a few requests for the Date Slice that we had at morning tea on the yarn tour.
This is soooo EASY and quite a nostalgic recipe for me too. It was given to me by a fellow classmate at school, we were about 16 yrs old, and that's what she said to me,
"you'll love it and it's sooooo EASY"
so without further ado....

Sharon Ellis' Date Slice Recipe

1 cup of Self Raising flour
1 cup of coconut
1 cup of chopped dates
1/2 cup sugar
125g butter
2 tabs of milk

Pre-heat oven to moderate 180C
Mix all the dry ingredients
Melt the butter and add the milk to it
Mix the wet into the dry and spoon and press into a slice tin.
Bake for about 20-25mins. You'll know when it's ready.


My tin of choice is a long rectangular fluted edge tin with loose bottom.
Always slips right out and is easy to cut into fingers.
I've been baking this for over 30 years now and I think and smile of Sharon whenever I do. 
Lots of love x

Thursday, June 30, 2016

A Locavore's Alchemy


Constantly at the fore in my kitchen and captivating visitors for the past couple of months is this book

"The New Wildcrafted Cuisine"
by
Pascal Baudar

Pascal is a professional forager in the Southern California region where his passion has taken this craft to its highest form. He inspires top chefs and home foodies alike to explore all the senses the local and oft over-looked ingredients, can evoke. Pascal doesn't just live seasonally upon the earth but immerses himself completely and reverently into the very alchemy of his local terrain.


"Oyster mushroom cooked in it's own environment
inspired by the smell of the forest after the rain" PB

Be not under any illusion that this is a foragers hand book and field guide. I suggest that for that purpose you should research and locate a guide book quite specific to your area and for those in Australia I would recommend "The Weed Foragers Handbook" by Adam Grubb and Annie Raser-Rowland as a good starting place and there are many more of course.
Rather, this book inspires the cook, passionate in seasonal local fare, to take a more personal and profound journey. 


The powerful evocative qualities of aromatics a just as key as the taste sensations.


This book has quite opened my eyes to the tiny, tiny ingredients, like lerp sugar in these cookies. 


Or how about pine pollen and seeds from mustard and dock?


Lots of ferments, shrubs, pickling, brews and extractions.


Seed sensations, powders, rubs, smokes and even goat cheese made with fig sap as rennet.

What I particularly appreciate about this book is the way it is sectioned into seasons.

WINTER; The forest time
SPRING: The green time
SUMMER: The berries and fruits time
FALL/AUTUMN: The seeds time

Each section explores the various ingredients of the time and recipes are included and techniques explained. There is also quite a lot of thumbnail pictures in each section visually identifying what is commonly seen in the landscape (of Southern California of course). While some are area specific I have been delighted to find many cross overs. 


Would I make half of what's in this book? Unlikely, but it's definitely got me excited and thinking further afield and asking myself
"What is a true Tasmanian locavore palate?"
and not just how does it taste, but how does it smell and visualise, how does it integrate our modern acquired species and ancient native bush foods.

What I would love to see is a further exploration of Tasmanian bush tucker along these lines incorporating some of our native ingredients more alchemically. Think of the possibilities!  

I have been following Pascal for years on his facebook page here and I was so excited when he announced he was doing a book. I ordered mine through Amazon and this review is completely voluntary and unsolicited. Pascal Baudar very kindly allowed me to use his magnificent photographs throughout this post, many thanks.

You may also be interested to re-visit this post on Tasmanian Bush Food


Monday, June 13, 2016

Pumpkin Fruit Cake


This fruit cake recipe I'm about to share with you is perfect for this time of year; it uses only two eggs (most chooks being off the lay) and pumpkin which is in glut now. For this recipe I choose a QLD blue which is a dryer style pumpkin and the rest of it I will use up roasting.


The pumpkin gives the cake moistness and a lovely golden colour. You only need a cup of mash. Just cook it up and mash it without any butter or anything else.


This cake is cooked for about 1 1/2 hours at 150C so choose a good tin and line with paper. You don't have to be as fastidious as when making traditional fruit cakes. This favourite tin of mine is quite thick and I lightly grease and simply pop an old pound butter paper in the bottom to line. 


This is great-grandma Murray's recipe and the only addition I make is grated fresh nutmeg - Mmmm goes so well with pumpkin. I'll write out the recipe below in metric also


Cool in the tin before turning out and store in a cool airtight container for a week. Use your own favourite combo of mixed dried fruit. 
I have in mind that I just might try this recipe next time substituting the pumpkin for mashed quince instead....

Pumpkin Fruit Cake

1 cup of mashed pumpkin
250g castor sugar
250g butter
2 eggs
2 tabs golden syrup
2 cups of Self Raising flour
500g mixed fruit
pinch of freshly ground nutmeg (optional)


Related Posts Plugin for WordPress, Blogger...