My Pins

Showing posts with label cleaning. Show all posts

Thursday, January 3, 2019

Teeny Jug and Big Lessons


This teeny tiny jug helped me enormously in my Christmas readiness....

For a couple of weeks in the back of my mind, I knew I was going to need more fridge space for influx of food and drink. I tidied and shifted and swiped a cloth over shelves and tutted and muttered.
How will I fit a ham AND a lamb joint?
You'll not get beer in this fridge I declared and threatened....

UNTIL....

This teeny tiny jug of Southern Style Hot Sauce tipped over in the fridge...

and
oh how far it travelled.

A mere 60ml ?

Well that was it! We all pitched in and pulled the entire contents out, washed and sorted and do you know what? I started the festive season with enough room and some. Room for cheeses and drinks and leftovers. More than that though was the freedom from yet another stress at Christmas time. Lesson learned.
A proper job leads to greater satisfaction.

And you know what else?
There is nothing like family all pitching in together to make a big job smaller.


Thursday, June 23, 2016

A Warm Glow


Having an older home adds another element to the housework routine-
Polishing!
In addition to the rolling monthly/quarterly routine of windows, skirtings, cobwebs I have added polishing. 


The door fittings, window fittings and even some light fittings are brass.


We have always had a big silverware polishing day in the weeks before Christmas but all the extra brass and copper requires a quarterly routine. By doing it regularly it prevents tarnish building up and keeps it a relatively quick job.


I actually quite like polishing.
I love the satisfaction as the shine is revealed.
I even like the smell of polishing.
Perhaps I wouldn't have enjoyed it 200 years ago without the benefits of modern conveniences like vacuum cleaners and washing machines that make light of our chores these days.


Nothing nicer than a warm golden glow about the house on mid-winter days.
And waxing.....
did I mention waxing......

"Bright copper kettles and warm woollen mittens..."


Thursday, December 17, 2015

Copper Polishing Is Child's Play


Copper polishing - Fun for all the family!
You should have seen the boys faces when I explained what their next "chore" was at the weekend.
I want you to take that big bottle of tomato sauce and smear it all over those pots.
They loved the slippery, tactile feel and that sort of forbidden feeling about playing with food.
Then it turned into a science lesson about the acid in the tomatoes reacting with the tarnished coating on the copper. I can just imagine Mr 9 when he gets back to school this week.


The sauce is the perfect medium for being able to lay down an even coat and just sit there a while to do it's job. After a while, a bit of a scrub with a brush and a hose down. Maybe they will need a coat or two more but I'm just pondering how stripped back to shiny I want them, a little verdigris is nice too.


These have come out of old hot water cylinders and boiler washers. They go perfectly with my copper theme for Christmas this year but unfortunately won't fit the tree stand but they'll look nice as planters or maybe present barrels or drinks tubs at family gatherings filled with ice. Wouldn't they be gorgeous overflowing with white petunias and poinsettia? Maybe I'll turn all three into a quirky water feature for the garden.....

Friday, November 13, 2015

A House Becomes A Home - The Next Room


And another room completed and a house slowly becomes a home.


We scrubbed and scrubbed. Over and over, layer upon layer, breaking the protein molecules and busting the smell, and not just the floor, the walls too. As the shearer and I remained on our knees, Cindy fetched bucket after bucket just like Mickey Mouse in The Sorcerers' Apprentice.


It wasn't enough, the slate on the hearth had to go....
and then the next two layers of hearth and the soil from beneath that.
(Read about it here)


Finally everything is coated in the shellac based primer Bin-zinser and the carpet can finally go down. Huge thanks also must go to our dear friends G&M (you know who you are) who came down and helped us several weekends with painting and fencing and feeding!


The large mirror reflects back light into what was once the original kitchen adding space to the room. A "nook" is created within the original cooking fireplace and the original swinging arm that once held pots and kettles will be the ideal spot for Christmas stockings. The unusual cushion from my daughter last Christmas made from a vintage linen tea towel seems very appropriate in our new country home.


The door from the bread oven is wire brushed and liberally coated with rust converter and then coated in black paint, restoring it back to it's former looks. The domed brick bread oven is several feet wide and deep within and would have been used to bake many loaves supplying a good many houses in the area and perhaps travellers.


While it would be great to fire it up for "pizza Fridays" (one of our long term traditions) it would just not be practical due to the size and amount of wood needed to create coals. Besides, before we can light any fires there is an awful lot of straw in the roof space to be cleaned out yet from decades of starlings nests! 

We are half un-packed and familiar things surround us once more helping us assimilate into the new space. My most treasured possessions are those made by friends and family; Matty's footstool, Cliffy's wooden box, great-grandma Murray's blanket.... 

This is not the pages of Home Beautiful and my life is real. There will be no purging and I have no need to make my home era appropriate. It is the helping hands, the generous hearts and the objects of love that make a house a home. A lifetime to collect memories. It has taken me decades to learn that and be content. We are so blessed.


And the work continues....
next
in the attic....


Tuesday, July 28, 2015

Cleaning, Stripping, Nourishing


We are making headway slowly and starting to see results for the hard work.
A lot of our efforts are concentrated on flooring with repeated scrubbing of all perimeters and skirting boards. Above is the third bedroom Georgian boards. Every time I washed and scrubbed, more dirt was smeared over everything so I had to resort to using a thin (old) knife to lift the compacted dirt from between the boards. The next step was to scrub each board with fine steel wool and turpentine and scrape old paint spots with a scraper, then apply bees wax to nourish and protect. Previous owners have painted boarders on the boards in the original rooms and we'll make a decision about that later.


The kitchen has been fully gutted and remediated and is currently drying out ready for the next step which is a coating of shellac based primer Zinser BIN and then re-plastering. It will be weeks months before we have a kitchen unfortunately. 


Our bedroom has been undercoated and the shearer is working on the ceiling which had foam tiles glued on it and even the ceiling rose is made of foam...(like Styrofoam) 


Every day we scrub and scrub with protein neutralising solutions but we are winning.
When it all gets too much and we need a "treat" we work in the garden. Already we have transplanted lots of fruit trees and we have the beginnings of boundary fences. 
Little by little.
We have had lots of visitors and their enthusiasm and positive feedback are so encouraging and we thank you all. You have no idea that such little things mean so much. 
We have had some wonderful help from family and friends too and I can't tell you how wonderful it is to have someone provide a nourishing lunch or dinner - what lifesavers you are! 


Friday, November 14, 2014

4 Steps To Blissful Gliding Drawers


Do you have old wooden drawers that stick and you shove and pull and silently curse every other time?
Well this simple maintenance tip will rid you of one little stressor of every day life.

It will work for most drawers unless they are too far worn or just poorly made in the first place. This maintenance should ideally be done at least once a year but it's one of those bottom of the list type of jobs, once you have done it though you'll wonder why you procrastinated for so long.

Step 1
It's always good to have a yearly assessment of your garments or a junk drawer clean out.
Pull everything out and be ruthless with "stay" and "go" piles. The first major no-no for good drawer health is over stuffing causing it to not close properly and catch on drawers above. Weigh it up! A drawer carry too much weight is going to really grind as it slides back and forth. Don't be tempted to just keep stuffing, because that is precisely what you'll do - Stuff it!

Step 2
I do one drawer at a time as many drawers are custom worn to their own space and if you remove them all at once it can be a bit time consuming trying to work out which drawer fits back where.
Take the drawer out and give it a good wipe over, inside and out. A plain damp cloth is fine.
Now is the perfect time replace the lining if you use any. A sheet of shelf paper, old wrapping paper or contact works fine.

Step 3
Fit a nozzle/small brush head to your vacuum cleaner pipe and reach into the drawer carcass and suck all the time worn wood dust from the crevices and runners. All this accumulated wood dust is also compounding the gliding problems and wearing down your drawers.
You may also notice some cobwebs waaayyy back there and the vacuum makes these easy to reach too. A very light mist into the interior of clove bud oil and water will deter spiders and soft insects and kill any mould spores (see this post for more info and mixing ratio)

Step 4
Now here is the real biggie in this process.
Apply bees wax
Take a small piece and run it backwards and forwards on all the running parts. As you rub the friction heat will also help it to meld to the wood. This fine layer of wax is key to your drawers gliding like a swan on water!
I get my beeswax from a local honey supplier and use it in my salve making but you can get it from craft stores also.

And that's it. 
A drawer left to wear down over time develops gaps and hangs and causes frustration. You have enough to deal with without having to fight your drawers every day in every room. 

Friday, October 3, 2014

Nesting Box Herbs


We have eight chooks and lately they have all taken to laying in just one of the nesting boxes. Not such a problem over the slower winter months when they slowed production but they were coming back into lay so it was time for a schoojsh up.

I cleaned out the old nesting material and re-filled with some shredded paper from the office and then a gorgeous downy layer of poodle hair (don't laugh, they love it; soft and insulating) and then I strewed the neglected nest with dried herbs.

They love it!
I use huon pine shavings for a natural insect repellent and also include dried calendula, mint, oregano, wormwood, lavender and rose petals. 
I'll also have the mix at market, enough for two boxes for $7


( Note; wormwood is thought to bring on uterine contractions and is recommended to be avoided by pregnant humans and animals. I find most animals will instinctively eat and poultry particularly will self medicate with wormwood for worm control as required. I've heard goats aren't so discerning so keep it away from gestating does.)


Saturday, June 21, 2014

Tomato Paste for 70 Cents a Jar and Other Savings


My daughter's final weeks of a difficult pregnancy were right in the middle of tomato season so I bottled what I could and made some relish and got the sauce done but the paste had to wait. I turned about 25kg into pulp and then froze it in containers in the freezer till I could devote a day to paste making.

We got a call to say that a sheep was ready and heading for our freezer within the week so it was time to clear it out and defrost ready for the arrival and so the pulp had to be dealt with.
You can read how I make tomato paste here or in the recipe book.
It is a process that takes quite a few hours in the oven so it's good to make economical use of it and bake along.


I had cut a pumpkin a couple of days before and that needed cooking off so I cut the rest up and it went in on trays with the tiniest sprinkle of some of my home grown caraway seed to roast. For lunch we mixed some of the pumpkin with lacto-fermented beetroot (recipe link here) and a dollop of home made yoghurt. The sweetness of the roasted pumpkin goes so well with the salty tanginess of the beets.

After lunch I roasted a chicken which also made space in the freezer. This is one of the young cocks that we raised for meat. We don't raise a lot of chickens but every year Craig gets about 20 day old chicks to raise and usually there is half and half of each sex. We cull the boys at about 14-16 weeks. The meat is amazing and takes me right back to childhood to how birds used to taste. This became dinner and the roasted pumpkin was added to the other vegetables accompanying it.

Some of the pumpkin went into ravioli and the rest went into soup the next days.
THEN,


when I finally turned off the oven I popped in a casserole dish of heated and cooled milk with a couple of tabs of yoghurt to make another batch of fresh yoghurt which was left overnight for a slow ferment and in the morning ready to eat. Yum!

So although I had the oven on for several hours I managed to make economical use of it. It was one of the things drummed into us at school during Home Economics class.
So working on the oven cost of about 35 cents/hour I spent say about $2 for the day but created several meals and ended up with 9 bottles of tomato paste.
I spent a further .30 on water bathing the paste in the bottles and $4 for sealing rings

 so that means I made each 280g bottle of paste for $0.70.
lunch cost about $0.20 for the home made yoghurt
roast dinner cost entirely free except for a tabs of flour and say $0.50 for onions (we didn't grow)
dinner the next night of pumpkin ravioli for 2 was probably no more than $2
Soup cost next to nothing but a few cents for heating
1 lt yoghurt total cost about $2

ALL that food for less than $5.00
and a batch of tomato paste for the pantry that should last us the year through for $6.30


I haven't taken costings to the nth degree like water for the tomato plants and I certainly haven't added a labour cost but you can certainly see how much you save by doing it and growing it yourself. It is without a doubt a team effort with Craig putting in more hours in the garden than I do and while we love making our own pasta I don't know that I could "whip up a family batch of ravioli" if I had a gaggle of young children. You might think it seems like a lot of work but it all unfolded nicely and I had a beautiful productive Sunday. There is nothing nicer than pottering at home, nurturing family, filling the pantry and getting things done. 


Thursday, June 12, 2014

Have A Seat Please


This is a bit daggy but I thought it was worth a mention...
well life is about the ordinary sometimes and it can't all be holidays and pretty things...
Our dining setting is almost puritan it's so functional and there are no soft seat cushions, just good old solid timber. The table is over hundred years old and the chairs at least seventy so they have served well many generations. It's easy to overlook basic maintenance on such forgiving timber colour but every now and then I give them a good going over with the enjo cloth and wipe down thoroughly, especially where hands have been pulling them out and pulling them in. It's amazing how much grime accumulates right under our nose. A couple need a hammer punch on some nails and check that the leg rails are in good order as these help to brace the chair making them strong. A chair that has come apart and been repaired is often a shadow of it's former self so keep them maintained before they get to that stage. Check the bottoms of the legs too, do the felt pads/discs on the bottom need replacing? If you have hardwood floors, these inexpensive pads protect the flooring and make moving the chairs quieter and easier.
Next you'll probably notice some cobwebs and a few daddy-long-legs running for cover. Wipe the underside clean from debris and give a mist with the clove oil and water and wipe over. Just a mist will do and will deter the spiders for a while. You can read more about clove oil here.
Now if you have upholstered seats I don't envy you, you have an extra cleaning step and will need to follow whatever procedure is recommended for your fabric and stain appropriate. Remember a good rule of thumb for an unidentifiable stain is to start with cold water so as not to set any proteins and then go from there. Good luck.
Now excuse me, the chairs are up and I have floors to wash. 

Wednesday, January 8, 2014

Where I Hang My Hat


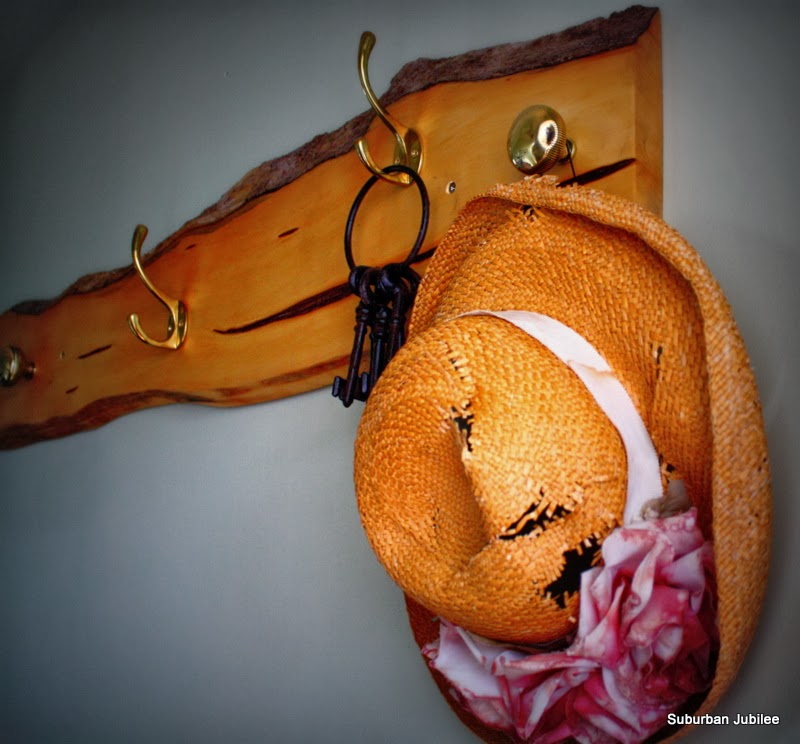
You remember last year we visited the wilderness of the World Heritage listed area on the west coast (post here). While in Strahan we bought some Huon pine blocks, wood shavings and a couple of plank pieces. For the rest of our journey they filled the car with their rich heady smell. 

I have used the shavings as a natural insect repellent in the hens nesting boxes and also in wardrobe sachets to protect our clothing and linens. Some of the blocks we gifted to a wood working friend and here as you can see, is what we intended the rough cut planks for.


Over the years we have collected hooks, knobs and all sorts of bits and bobs. You never know when something is going to come in handy and I can't bring myself to just throw things on the scrap heap especially when I think about it's provenance. 


Somebody kissed their wife goodbye one morning back in 1880 and went to the foundry and spent a cold winters day making the small ornate window furniture. He cast it and then it was mounted onto the fixing plate with a sturdy hinge. A builder sourced it from the foundry and fitted it to a little home in South Launceston where it hung quietly for 100 years watching generations come and go and renovations all around periodically. In those days it hung up the other way, the hinge allowing it to fall flat and snug against the window until someone inserted their forefinger into the perfectly shaped and fashioned groove under the furled leaf shape to lift the window.During one of those renovations it was finally removed and for 30 years it sat heavy, dull and dirty in a box till it found it's rightful place to shine again.


Do I wax to lyrical, do I place too much importance? I don't know, just seems to me that in a world where giant behemoths of trucks scoop tonnes of ore from the ground in a single swipe and hundreds of door handles are cheaply cast in their thousands that we should do some homage to sweat, toil and craftsmanship of yesteryear because we are in danger of becoming very blasé and casual and it is this state of mind that allows us to become the "throw away society"


The timber has been simply coated with bees wax to bring out the golden honey colour. The assorted fittings were polished and buffed and appreciated for their unique qualities. It's not everyone's style and it's a bit "rustic" but to me it tells a thousand stories and memories of our holiday is just one of them....


Friday, November 1, 2013

Civic Duty- Is It Dead?


Is Civic Duty dead or perhaps it absconded with Common Manners
The following is my opinion and certainly not meant as a blanket judgement on all circumstance but I use the following as an example.
First let's define what I mean by civic duty and I would like to use this definition as proffered;

"civic duty is to be a good citizen, obey the laws, serve in the military in time of need, be active in community activities that are supportive of something positive. These are the types of things that enable masses of people to live in proximity and prosper."

A patient at the clinic once commented to me that when he was in paying his rates that he also asked them for a sum of money to cover the petrol he used to mow his nature strip. He didn't expect to be given the compensation but he was serious about his resentment. But surely that is just a part of civic duty I said whereupon he shifted uncomfortably. I remember asking my Dad when I was very little why he mowed the footpath and he said it was just being a good and helpful citizen and made pedestrian ways more pleasant and enhanced the surrounding environment (or words to that effect as I was very little but I understood the meaning). It was always once generally accepted that this was appropriate practice but there is a strident note creeping into people's voices on all matters and it centres around "my rights", "I pay" and "not my responsibility"
It is yet another way we have decided to turn our backs on our neighbours and bunker down in our own little environments. 
I believe council resources are stretched and I think we all have to take part and pitch in. Shop keepers once used to sweep their paths but I never see this any longer. Some people have impossible verges but most people still have some sort of access along their road or to their letterbox.


There is no-one living next door and the grass is mostly long all year round except for a strip that Craig mows so the postman can access next door's letterbox. It's just a common care and courtesy he extends that says I care about your comfort and safety as you go about your job performing a service for us.
When we visit a park or walk along somewhere and we find rubbish, we clean it up. We didn't make it but does arguing the point make things right? If we just pass over rubbish in public areas we are sending a message that leaving rubbish lying around is OK. Gradually things become the norm and habits form. I would much rather the habits be for good.
Our local environment is just one small insidious effect of the erosion of our decline in civic duty.
More alarming is the decline in volunteer groups like the Parents and Friends at schools, The Lions Club and Rotary. Even our Neighbourhood Watch that Craig and I letterbox drop for looks like folding because there is no interest. Our communities are in real crisis and we need to step up if we are to continue to live together and prosper. 
Please tell me some feel good stories in your community. Convince me that civic duty is not dead in your area.


Saturday, August 3, 2013

How To Clean a Standard Vacuum Head


Why bother?
Read on and check out the pictures to see why....
Vacuum cleaners are a wonderful time saving invention and to get the most out of them from time to time we need to do a little maintenance. You probably regularly change the filters and give it a wipe over and use the nozzle to suck the head bristles but do you ever overhaul the head? It's a good idea every 12 months or so to pull the head apart and give it a good clean, and I'll show you why.....

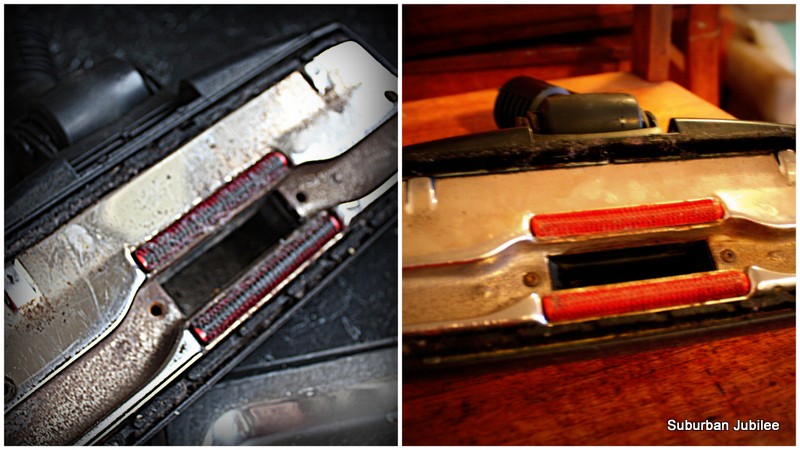
The picture on the left is before and the one on the right is after....
Take a good look at the head before you start taking it apart, note the angles and the way it sits, it's a point of reference when you are getting it back together.
Unscrew the plate from the head, there are usually four screws, put them in a safe place....


carefully lift off the plate and locate the springs that sit within, there are usually two, put those safely with the screws. 


Just look at that great compacted gob of lint and dirt! You may have noticed that the presser foot that raises the bristles from smooth floor to carpet mode has been getting a bit tetchy and temperamental of late - that's why, it's FULL up!


 That mess of impacted filth is also severely hampering the suction at head level and the flow of dirt to the bag, meaning your vacuum is not working efficiently, the motor is working harder and you're worker harder.
But wait...there's more!
Now lift off the inner plate from the outer head housing....


Yep! Even more fluff and dirt, it's a bit hard for you to see but there is also great layers of it clinging to the metal plate above in the picture. Is it any wonder your machine doesn't seem like the wonder you bought some years ago.


Once you have removed all the loose dirt and grime, give it a good soak in warm soapy water. No need for harsh chemicals, just some plain washing up detergent. The plate with the bristles will probably need the most soaking and picking at to remove caked grime.


While the bristle plate is soaking, dry off the bottom plate and get to work with some metal polish. This will remove some of the surface rust and bring it back to (almost) show room shine and be gliding over your carpets again like when you first bought it.


Can you see the difference on the right where I have hit it with some polish? Ideally your floors should be absolutely dry when you vacuum but inevitably you will see some moisture damage on the head. I am not going to get this back to pristine but it's much better.


Let all the parts dry thoroughly and take your time putting it back together, don't force anything, feel your way and look at it logically how the pieces go back again. Make sure you have placed the screws back where they were and screw the cover plate in place. 
Your clean head should be working like a dream again.
If worse comes to worse and you can't take the head apart or get it back together, just take it to your service agent.


Wednesday, June 5, 2013

Cleaning, Foraging, Divining


Our Living Better group met last week and we celebrated our first anniversary.
We had a speaker from the group talk about cleaning without chemicals. There are a number of ways to achieve this and each style suits different people, their lifestyles and methods.
There is the Enjo method which is reliant on just water and the micro-fibre of the cloths. There is also the home based methods of pantry items like bi-carb soda, vinegar and lavender oil for the very industrious. The third alternative that Elisha presented to us was by Nature Direct. It relies on the micro-fibre cloths AND different blends of essential oils and extracts, like pine, cypress, eucalyptus, clove and rosemary. It is an Australian company and nearly all the products are made in Australia which is important to us. Chemical cleaning manufacturers are not required by law in Australia to list their ingredients but they are required to list warnings....and there are plenty of those. The products from Nature Direct list all their ingredients and while you wouldn't want to ingest them, they are certainly not going to cause great harm. Check out their "Did you know...?" page here.

Our next guest speaker was Bridgette from Urban Farming Tasmania.
She runs a "market" on a Monday at the Tasmanian College of Arts and the idea is that people bring produce from their gardens or foraged along with any other trade items like music, artwork and design. Her group essentially wanted a community style market where no money changed hands and people supported each other by trading their surplus. They are passionate about seasonal living and not letting food go to waste, in fact they are wanting council to plant more food instead of ornamentals. They have produced a free food map of the area plotting figs, walnuts, apples, sloes, quinces and more about the greater Launceston area. We all received a gift from Bridgette (pictured above) of quince paste made from local foraged fruit. We were very excited by her project and many more tree sites were suggested 
BUT....
stay tuned for there is more to this story.
In the few days since we met Bridgette, Council has been made aware of the group through a newspaper article and they are coming down hard but I want to discuss this more fully in a day or so when we see their final stipulations. You can see this all unfolding on their facebook site. There is a can of worms here.
A very controversial point still in debate at the moment is the legality of foraging fruit from public land. They seem to have an issue with the food map. People on both sides are scrambling to find legalities. 
Does this mean fishing is not legal? To me that is foraged food from public land?
Anyway, we will have this debate in a day or two. In the meantime please show this group your love and support with kind messages.


Our last speaker introduced us to water divining. The image above from WikiHow is very similar to the rods we tried (as usual I got caught up in the moment and no pictures!)
Martin told us his story and demonstrated as he walked about the room how the rods moved and swayed. Each of us had a turn and were amazed at how the rods swerved and we were not able to control it. It is very hard to understand and though there is plenty of documented anecdotal evidence, I don't think there is any scientific specific evidence. 
It was a really interesting and fun way to top off our night. This is a new venue for us too and I am pleased to say that it was wonderful having a large quiet room all to ourselves. We would not have been able to have the cleaning demo or the water divining demonstration as well in the pub. The lighting is good and it is heated and we have our own toilet amenities too.  

Our next meeting is 27th June 7-9 at the Workers Club in Launceston
We'll be discussing winter remedies and bee keeping and possibly fruit tree pruning.


Monday, April 1, 2013

An Autumnal Change


Easter Monday has been distinctly autumnal here today so we have had a change of decor to welcome in the season. 
Starring.... 


My new favourite pumpkin the "Turks Turban"


Nan's cracked, repaired and chipped cookie jar


Craig's new find, a lone Merino Ram pepper shaker that he found for $3 last week in a sensational little shop at Wynyard (Tas) called Mother Hubbard's, check it out if you are in the neighbourhood.


And St Joseph also makes a come-back.
All backed by a glowing cast of orange, copper and amber with warm leathers and old wooden boxes, scented throughout with ground coffee beans in the vintage coffee grinder collection.
It's a folly but at least everything gets a good thorough dusting.


Related Posts Plugin for WordPress, Blogger...