My Pins

Showing posts with label decorating. Show all posts

Monday, April 15, 2019

The Wedding Flowers


The flowers always play a huge part in any wedding decor and you need a lot of them for any kind of impact, especially in a bare paddock. We are not professionals by any means and I think this goes to prove that with some help and YouTube tutorials, almost anyone can pull off some pretty floral decorations. 


Firstly make sure you know what style the bride is expecting; casual, cottage, field or formal, colour specific and traditional. 
Next really take a mental snapshot of the time of year and what will be growing then. Start assembling some lists of flower contributors and don't forget the very important green fillers.
One of the tools I found useful was to collate pictures of in season flowers on a pintrest board and share this with the bride so she has the story too.
Start putting some flowers together in arrangements to see how the colours and textures sit together and more importantly see how they fare over the next few days for their durability after being cut.


Before the big week it's time to make checklists and start assembling the vessels, lighting etc.
If you are decorating a marquee you will need a very tall ladder; the six footer is not going to cut it. Some of the more obvious equipment will include but not limited to: secateurs, gaffer tape, chicken wire, florist wire, cutters and oasis foam but don't forget a staple gun, impact drill, batteries, rubber bands. cable ties, needle and thread and a spray bottle of water. A folding trestle table will be invaluable and take insect repellent!


I was fortunate to have the the back of the ute to work with when I was packing the flowers, otherwise, set up a table to save a lot of back breaking. Cutting started at dawn and you need to allow yourself a good couple of hours or more for this job. These "Pierre De Ronsard" and "Naheema" roses were the key flowers in all the ceremony arrangements; that is the bridal arch, the signing table and the large urn backdrop. It's good to bear in mind not just the "prettiness" of the effect you are creating but also backdrops for the photos.
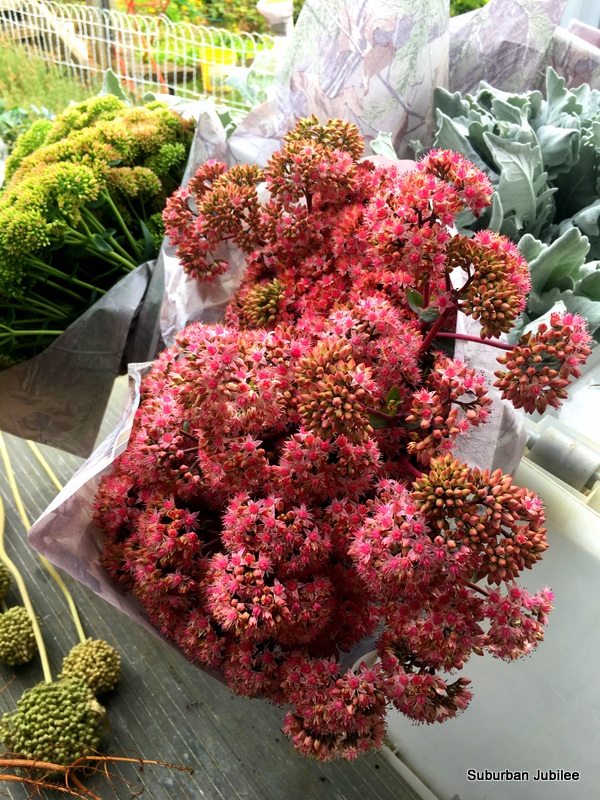

Sedums were the huge hero of the day and coped quite well with the 39C heat and wind when all else was flagging. They filled arrangements elegantly but be warned, the bees LOVE them and several varieties of bees came from everywhere to sup at their cups.
Top right is the lovely silvery velvet of Dusty Miller, also durable and a great contrast. Down in the bottom left is the old alium heads that were great structural additions in tall arrangements as were the dried towering russet seed heads of the giant ruby rhubarb that I grow, pictured below.


These looked amazing in a really large spectacular dimension arrangement in my urn on a column. You'll have to take my word for it as there are no photos because just before the happy couple arrived at the ceremony, the wind captured it's magnificent proportions and propelled it to the ground where the urn smashed. All we could do was quickly kick it to one side out of view. We managed to salvage most of the pieces and Craig has glued it back together and it looks a vision of antiquity and will live another day at another event some time I'm sure.


In the absence of a van, the flowers had to travel in my car as they would have been devastated by the wind on the back of the ute. Very tall bucket meant I could travel with water in the bottom but a few bumps in the road would not cause spillage. I have a huge ream of wrapping paper that I bought from a florist supplier years ago and it really came into it's own. Every bunch was wrapped in neat cones to protect the flowers during travel, limit their expiration and make packing into the buckets safe and easy.


Greenery is just as important as the pretty stems too. I had a whole bucket tightly packed of ivy: IMPORTANT- this is highly irritating so wear long sleeves and gloves (also another vital to add to your packing list) when working with it. I had two buckets of lovely hardy spinning gum cuttings and a great sheaf of twisted willow. I also had large stems of agapanthus (flowers spent) which I cut the seeds from creating balls of green globulous sticks. Very striking.


I had been watching the long term weather forecast avidly and it became more and more apparent that we would be in the middle of a scorching heat wave. That is why I decided to add in some dried elements. This massive bunch of Love-In-A-Mist gone to seed would become the central feature in the marquee with woven bud lights through it. I knew a massive fresh ball of floristry was going to be problematic.


I had the car absolutely packed as tight as a sardine can and boy was I glad to get to the other end. Two hours inside a closed car full of flowers and greenery was overpowering! The shearer took all the hardware on the ute along with the ladder and urns etc. 
At the other end the buckets were placed in a cool dark part of the house where they remained from Thursday until Saturday morning when they were taken to the site. 
IMPORTANT - Check their water during this cool store time and top up. You'll be surprised just how much they'll go through.
On Saturday morning at dawn we picked more roses, dahlias and the gorgeous lemon ginger flowers seen above from my daughter's garden. Everything arrived at the venue in tip top condition and we worked fast and furiously for a few hours. It was so unfortunate that we had such unseasonable weather. There is not much you can do about it but be ready to adapt and be fluid with your ideas.


By doing the bulk of the flowers ourselves we saved a substantial amount of money but more than that....
and I hope I can express this right...
The flowers came together by the giving from family, friends and neighbours and I certainly saw a creative side of my other sin-in-law who helped us with the many arrangements. I'm sure they thought they were simply pitching in but more than that...
When I look at these photos and remember the day and the flowers, those family, friends and neighbours wove themselves into the very fabric of the memories of that day. I can't help but look at the bridal arch and think of Dino and his beautiful garden that I am privileged to wander so often. Of Rae so generous and vibrant, delivering a whole ute load of spinning gum branches. Of Leslie and her twisted willow and I see her smiling face. Of mum, delaying the cutting of her ivy so we would have long stems for the day. Of Susie who sat with me for five hours, she at her machine and I at mine and we made metres and metres of bunting.
And on and on....
Thank you to so many for all their love and support, It really makes a wedding when so many people are intimately involved.

Here are some really great tutorials for event flower decorating...

this one is long but a beautiful thing to watch - 


Sunday, February 10, 2019

Countdown To The Wedding


If I appear a little quiet....fear not for I am busily putting together the wedding decorations. My eldest gets married in just under three weeks and I am trying to coax the flowers to ignore the sweltering heat and keep coming towards fruition.


Maybe there will be a lot of foliage and seed heads....
Working with living things and trying to plot their course on a calendar....isn't it exciting!!!


I'm gathering together pieces to interpret her "Boh-ho" vision. Her brief "Not really a colour theme, sort of Turkish rugs and candles, not cottagey, a bit Lux....vague...mutterings and hand flingings....
oh and we'll be in a paddock don't you know.
I've been watching a lot of floristry tutorials to learn how to do really large scale event pieces. Fingers crossed.


I just found out we also want bunting for the marquee....
again, a bit vague on a colour story so I have chosen to pull out the accent colours within the Persian style rugs that we are scattering everywhere with straw bale seating.


The upside is that the stash is getting a really good bust-a-long and thank goodness for the invention of cutting mats and wheels. My very clever man also zipped out to the shed and knocked up a template for me in lovely acrylic so I can cut accurately and quickly.
Big Love.

All the while it is coming into preserving season and I am pressure canning lots of vegetable soups, curries and casseroles for shelf storage to try to use up the zucchini glut.
So I am still here, just reeaaalllyy busy.
#markandtedwed


Monday, February 6, 2017

An After and Before


Thank you for your lovely comments and input.
Some have noted the very quiet January.
All is well here but it has been a delightfully busy Spring/Summer and we have taken full advantage of having the son home (or as one of his sister's calls him, "The Golden Child") for a couple of months.
He loves to garden and practice animal husbandry and over the next few posts I'll show you what we've been up to.....


But for now, here is an "After and Before" photo, just for a change. We are excited to be painting the window and door trims and the front fence very soon but isn't it amazing what a bit of garden can do?


Friday, December 23, 2016

Christmas Shenanigans


The Golden Child is home for Christmas and in his bedroom on the mantle I had a simple 
NOEL

I should have known better.....


After playing around with the 4 letters for a couple of days he commandeered the "P" from PEACE in the lounge room mantelpiece.


 He's had quite a bit of fun but now......


I think he might be 
DONE!


These cute little Santas have been playing up too!
I sat them demurely on the sideboard shelf.


But the old floor has quite a bit of give in it and the furniture vibrates with all the foot traffic and the Santas go walking....


Time after time I save them from nose diving and line them back up but after a couple of weeks of this....


I've given up!
They are now in the spare bedroom on a very solid window sill.
No more walking!

Wednesday, October 5, 2016

Fairies in Flood


I love a bit of fairy gardening but I haven't quite re-established it at the new house. I located a box of all the bits and pieces and they are higgledy piggledy under a tree so far. 
One of my jobs whet my appetite though....


I felt like one of the luckiest girls in the world yesterday when I was asked to display the new fairy range at a gift shop in town.


The little weather resistant painted houses have solar panels located in them and glow at night. What fun! Little meadow mats also bring little plots to life.
This is not how our "meadow" is looking however....


We've had lots of rain and the minor flooding turned a bit major as creeks backed up at culverts with log jams, paddock debris and general human rubbish. We have wild ducks flying in to swim and gorge on floating dead worms and snails.


Every morning I have to wade out to the rain gauge in my gumboots as we collect data for the Australian Bureau of Meteorology. The chooks spent the first night out rough as they became stranded from their quarters with the rapidly rising water. The sheep have found a high patch and have plenty of feed.


Now to find those fairies.....
Hope they stayed high and dry!

If you want to see more of the fairy items I unpacked yesterday click here


Monday, September 19, 2016

A Corner Is Turned


We have turned many corners this month, weather-wise and house-wise. 
It's been just over twelve months since we actually moved in and a LOT of the work has been done and we are living comfortably and joyfully.


We are creating a garden now rather than just the emergency food growing area. Everyday I try to spend even just 10 minutes weeding and transplanting self sown seedlings around the place. The garden is still low on the budget stakes as we continue to repair the house and using what nature gives you is a fine and frugal way to create abundance.


We are blessed with beautiful flood plain silt and humus of many ages and are putting down stronger roots and sending them into the soil of our community too. We are bringing in the spring blossoms and welcoming the change and new friends into our life.


The pressure to get things done has relaxed and we are enjoying the journey and getting back to some normal activities.


I bit the bullet and ordered a pressure canner from America. And yes! You can use your Fowlers jars so need for extra jar purchases.


I've been canning the dried beans from last summer along with some chickpeas, giving us a ready to use product from the shelf instead of having to plan ahead 24-48 hours with soaking and cooking times of dried legumes. 


We've been scoping out potential country hanger and runway sites close to home for the shearer's plane. He is getting close to finishing it now that he has less house reno demads upon him. I'll post some photos soon.


We've been scoping houses too looking at trim colour options and fencing and landscaping....


The Heritage specialist builders are still at work in the front room putting layer upon layer of traditional lime render on the walls and paint stripping continues also. Our next big and hopefully final piss-problem to deal with will be the front threshold. It will need to be replaced and these guys will be in charge of that as well.


After 12 months I have finally been able to clear out all the furniture and building materials out of the children's' cubby house and restore it back to it's original intended use. I can't wait till Julien visits and discovers it for the first time.
All in all, there is a positive change in the air and we feel like we are home and blessed.


Tuesday, August 16, 2016

Simple Inexpensive Furniture Restoration


Everyone loves a "before and after".
This is the story of how an old desk top became a blanket box.


We acquired this old sturdy piece from a friend when they were clearing their mother's estate. It's a little broken about the edges but still solid and appears to have been a desk top at one stage now without legs (if it ever had them?) First things first was a thorough vacuum, then a good wipe down with a damp cloth.


Next I used a fine steel wool (#00) and some methylated spirits to clean off the old grungy layers of dirt and perhaps ancient wax or shellac layers. To do this, take a modest wad of stainless steel and apply a generous amount of metho, rubbing lightly with the grain and using clean rag pieces to wipe the grunge to remove before too much metho has evaporated leaving a sticky residue. This method works well on naturally finished woods like wax and shellac. Other varnishes or polyurethanes may require a caustic stripper.


Fine steel wool is excellent for cleaning up brass too, like these hinges. I'm not repairing the broken, chipped corners. This is not a "fine" antique and there is no use pretending it is. It's the broken and the scratched that tell a story and make these rustic pieces the treasures that they are.


My original plan was to shellac this piece but I felt the lovely high glossing would perhaps not be as appropriate as an oil and wax treatment to nourish the wood and the gentle glow somehow more honest and in keeping with it's altered nature.


Many old pieces can be brought back to a beautiful life very simply and inexpensively. This took me only a few solid hours of cleaning and polishing. You could do it too. To give you some idea, this project required 
about 400ml of methylated spirits
about six wads of #00 steel wool pulled from a roll
One old shearer's singlet
and wax and oil for finishing.

To nourish, I tipped small amounts of furniture oil onto the pan of wax and then used a soft lint free cloth to apply and buff - inside and out. Before deciding on the finish, I experimented on the back to see if I liked the effect.


Now it's ready to do service as a blanket box.
Don't forget to lay sachets of insect repelling herbs inside too.
You can find my recipe a little down the page in the post
and if you would really like to dip your toes into furniture restoration,
you could start by checking out
on YouTube. He has some great vids with great background music.

Monday, August 8, 2016

Paper Trails


After we left Callington Mill precincts, we travelled up the main street of Oatlands to "Alan's Verandah" the next venue for the historic skill of wood graining and a discussion of other faux finishes and decorating styles of the Victorian era.
What happened next was nothing short of "historical porn" and an unexpected meeting with a genuine wallpaper guru, Alan Townsend.


We did legitimately dabble and ooh and aah with some paint finishes like flame cedar and birdseye maple but then what followed was a history lesson that sent me to 7th heaven.


We were invited to tour the mid 1800s timber constructed cottage and peer at it's most intimate layers, and I DO mean LAYERS!


Layers upon layers, decade upon decade.....
Tragically beautiful and exquisite in it's decay.


So the very basic construction of this cottage, and in fact other similar timber cottages of it's era, is timber weatherboard exterior with some stone foundation and the interior walls are a patchwork of split shingle-like timber rather than commonly known lathe and plaster. These interior walls were never meant to stand alone but to be thoroughly swathed in decorative papers.


Upon these crazy patchwork timber bases were laid the first layers - newspaper. A very effective and indisputable dateline for the cottage's construction. Next came the fabric layer. Whatever was cheap and recyclable. In this one front room is found hessian, the very coarsest and cheapest material and also some recycled mattress ticking. Then upon that is the decorative paper. Drafts are excluded, the room "insulated" and then decorated. 


Alan is a professional researcher and historian and sensitively handles and documents the life of the building on it's preservation/restoration journey. Large segments of "art" paper is collected and saved, the floral 1970s wallpaper treated as deferentially as the faux stone paper borders of the late 1800s.


And not just the wallpapers, but also the layers of floor coverings from many decades that chart the years of various property owners and fashion stages.


I wish I could have reproduced the colours faithfully for they were truly beautiful.


Can you imagine the plethora of documents and interesting ephemera tucked into these layers? I couldn't and I was totally flabbergasted at the range of invoices and documents.


Marriage certificates, lengthy shopping invoices, doctors bills and fashion pages.

  
So much history is revealed about the community and the way of life of the town and attitudes of the eras. It speaks also of a time when paper and fabric (things in general really) had a real value and nothing was taken for granted or casually wasted. He said he has also found the practice sheets of copperplate handwriting of young students copying over and over religious verses simultaneously learning their moral code and handwriting in one lesson.


Alan is currently working on techniques to renovate the space of each room but also keep it's history intact and enfold it's precious layers. As you would imagine, several decades of wallpapers tends to distort the planes and corners are lost to rounded swells and even the very foundations shift and twist over time too. Any other person would have stripped with gusto and brought in the plaster sheeting. He is a far braver man than I and most skilled.


Only a creative eclectic like Alan could live within this chaos as he learns and works with the house. His crazy mix of superb antiques and art juxtaposed with the slow and complex decay, but slowly and sensitively he transforms the space back to a home.


It is quite an extreme form of "shabby chic" don't you think?
We were truly privileged to meet Alan and bask in his enthusiasm and freely shared knowledge and experience.
My favourite quote of the day from this historian was "By all means, people should enjoy their homes and express their style, change the paint scheme and improve their comforts but resist stripping and removing. Above all, avoid removing anything, leave it for the telling"

to experience more of the world of historic recreation and wonder of Alan Townsend.


Related Posts Plugin for WordPress, Blogger...