My Pins

Showing posts with label renovation. Show all posts

Wednesday, February 13, 2019

Georgian (Story) Boards


Get set for another before and after story. This time we feature the original Georgian floorboards and their stories.


Like every other room, the hallway was scrubbed and scrubbed dozens of times with a pericarbonate solution because of the cat destruction, leaving the boards stripped and dry. 
As you can see, otherwise, they are in pretty original condition and carry the decades of wear upon them. Note the colour difference and tack line where a carpet runner decades ago was tacked into place and of course the paint spills from previous "handy men". The boards have aged incredibly and still hold a dead straight line and some faintly show the pit saw marks. There are gaps but this allows the boards to swell and contract and we are not subject to draughts because of the solidness of the foundations and the special draughting tunnel built under the boards


The entire area was prepped by a thorough clean down with methylated spirits. Beeswax was gently melted in a ratio of 2:1 with Gum Turpentine. This creates a pliable, softish wax that is skimmed lightly across the boards to put down a thin layer that is then worked and polished with ultra fine steel wool (like size 0). The friction creates warmth and spread the wax in an even layer and helps it to penetrate the timber fibres, nourishing and evening, leaving a hard protective coating but most importantly, a breathable finish.


Rather than plugging holes and filling nail heads, we leave in full view the tribute to a time when every nail was hand made. Many people are tempted to sand back to perfection and then coat with a polyurethane finish.  I find this natural product and glowing finish to be the perfect treatment as we step as lightly as we can upon the history.


Monday, March 19, 2018

Another Before and After- Sort Of


This small front strip of garden has had a few stages in it's transformation. Above is how it looked when we first moved in and...


you can read the story of the exciting path find here.


It has since been given a tidy and some planting while other projects took priority. I have planned all along a white garden for this front area and our budget somewhat hi-jacked has priority constraints too. 
Last year I planted 50 white tulips and white daffodils and two Teddy Bear magnolias flanked the front door.


This month I started removing the temporary plants not part of the scheme and laid some weed matting and defined the two beds with some convict bricks. 


Finally I have my long awaited gravel and the front is coming to plan. It's a sandstone colour and goes well with the dressed stone of the cottage. The Erigeron "Seaside Daisy" forms some permanent clumping in the bed and mostly annuals will provide the changing views of this garden. The battering westerly winds would be too much for standard roses etc. 
The plants in this area have to survive quite extreme conditions; westerly sun and winds, frosts down to -7C and low water. We are very mindful of not interfering with the house foundations and the natural breathing of the building.
So for next spring I have planned that white larkspur, wall flowers, and sweet rocket will accompany the white bulbs and be followed in summer by white cosmos and dahlias.

The next part of this project is to paint the windows and front door fresh glossy white and perhaps the front iron fencing too...or perhaps black for that.... 


Monday, February 6, 2017

An After and Before


Thank you for your lovely comments and input.
Some have noted the very quiet January.
All is well here but it has been a delightfully busy Spring/Summer and we have taken full advantage of having the son home (or as one of his sister's calls him, "The Golden Child") for a couple of months.
He loves to garden and practice animal husbandry and over the next few posts I'll show you what we've been up to.....


But for now, here is an "After and Before" photo, just for a change. We are excited to be painting the window and door trims and the front fence very soon but isn't it amazing what a bit of garden can do?


Friday, December 30, 2016

Another Door Opens


As we close the door on 2016, here is a look back at the year that was for Suburban Jubilee.


If I had to sum up the year in a few words, it would have to be,
"Before And After"
Our year was mostly about renovation and they proved to be popular posts.
(Before and After - Front Room)
(Before and After - Hallway)


Not the least of which was the new kitchen finally going in at the beginning of the year just in time for the big preserving season.


We kicked some goals outside too with a major shed renovation


Saving a fortune and gaining some much needed storage space.


And the gardeners loved our before and after wrap up of 12 months in the garden.


Lots of preserving from our new hedgerow; quinces, elderflowers/berries and plums.
Favourite recipes were


The (sooo easy) Date Slice from our Yarn Tour 2016

It was a very, very wet year.
We flooded
TWICE!
But no real damage done. Our dear neighbours have been heroes accommodating some of our equipment in their shed when the waters rose and we can't thank them enough. 
We lost three of our old chooks in the flood but we are working on renewing the flock. Izaac and I have purchased a couple of Black Australorp roosters who are currently in quarantine and will shortly join our girls in the hopes of some new blood. But that's a story for the new year.


Lots of knitting....


Back into soap making....


A couple of Kidney Australia fund raisers.


Lot's of cooking and entertaining.
Old school friends and family visited from the Mainland making it a very special year in the new house.
Getting the work/life balance just right!

We've learnt so much this year and embraced our seasonal life in a rural setting.
I've been grateful to the beautiful people of Campbell Town and the way they have opened their arms and welcomed us in. When pesky work permits, I am a member of the local gardening group and the singing group. We have started to forge lots of lovely friendships.


(view from the kitchen window)

Our year has been all we could have hoped for and we feel Blessed.
As we open the door on another year and another chapter,
we wish you a prosperous and healthy New Year.
Thanks for your support and friendship throughout the year.
Love T.


Monday, December 5, 2016

The Hall - Before & After


Not as dramatic as the previous post but here is the "hallway reveal"


This was the hallway "before".
Tastefully done a couple of decades ago with a somewhat Victorian era influenced wallpaper with matching borders but given the clean up required it was all quickly stripped. The Federation green was also a bit dark and solid to live with to be honest.


We've gone with a white gloss on the architraves and skirtings and "hog bristle half" on the walls as in all the other rooms. It's quiet, calm, light and above all clean.
Unfortunately the front few floorboards are so damaged that they have also been coated with BIN Zinser and painted in the gloss white. The threshold stone is a type of old cement laid over the very worn original sandstone step. It has been impossible to neutralise it so it is coated also and when our specialists can get to it, they are going to have a new sandstone one cut.


It's lovely to have the art back up on the walls again and perhaps one day we will discover a narrow little hall table.


But what's this....? Front and centre....?


Don't tell me I don't have a sense of humour!!!
(If that doesn't make sense to you and you are new to the story you might like to check out some of the other renovation posts)


We feel fresher and lighter along with the house and we finally feel very much at home.
Thank you everyone for coming on the journey as we tackled these major jobs. Thanks for your support and encouragement and excitement.
We now gather family closer around us and are busy getting ready for Christmas.


Sunday, December 4, 2016

Before & After - Front Room


Are you ready for another before and after?
We've had a massive push on in the front room to get it ready for family flying in for Christmas. This is one room that I thought we would never have a win.


Back in June, just walking in her would crush me and shake all my confidence despite the success in the rest of the house. This was the room, that despite dozens of layers of protein breaking solution, still smelled over-powering of cat urine. You may recall we had previously dubbed this room the "pissoir"


No longer!
Victory!
But you know the saying "no gain without pain", it's true and this room is testament to how thorough and assiduous you have to be when dealing with this type of animal damage.


There is a previous post here about the removal of part of the walls and it has great construction reference photos, and here the remediation story continues.


So after all the scratch coats and a final top coat and a couple more weeks drying, the walls were ready to continue on with. Taking out those sections of render made a huge difference to the smell BUT I just knew we needed to go further and remove the skirting boards and remediate them also.


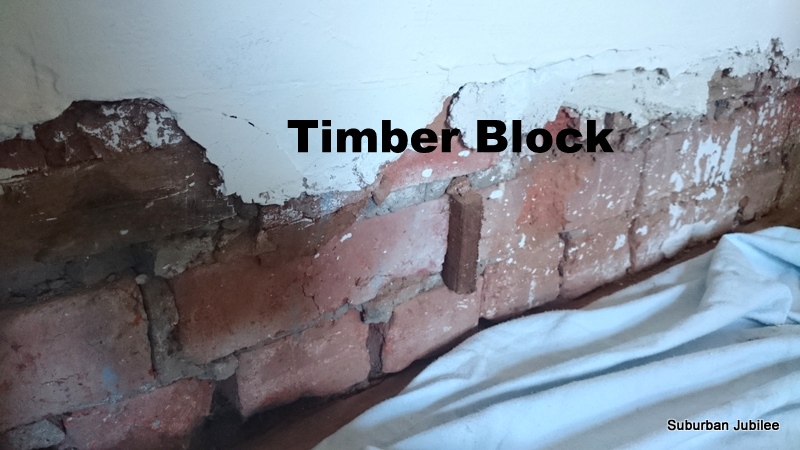
This was a big decision because we would risk damaging them and also faced the daunting task of re-attaching them. So here is what we found beneath. The clever builders place blocks/wedges of wood periodically between the bricks to give the nails a place to hold to.


Above is the outer wall showing the bluestone foundations and the timber for the skirting boards to affix to. It turns out the skirting boards (about 10" deep) are made from Australian cedar. It broke our hearts to have to treat them so ruthlessly but we had to scrub them about four times including the back and sides with enzyme solution to neutralise the urine that had gone down the walls and behind them. Then after thoroughly drying, they were coated on all sides with BIN Zinser, a special shellac based primer. They were then carefully re-attached with a rubber mallet and utilising as many of the original hand made nails as possible.


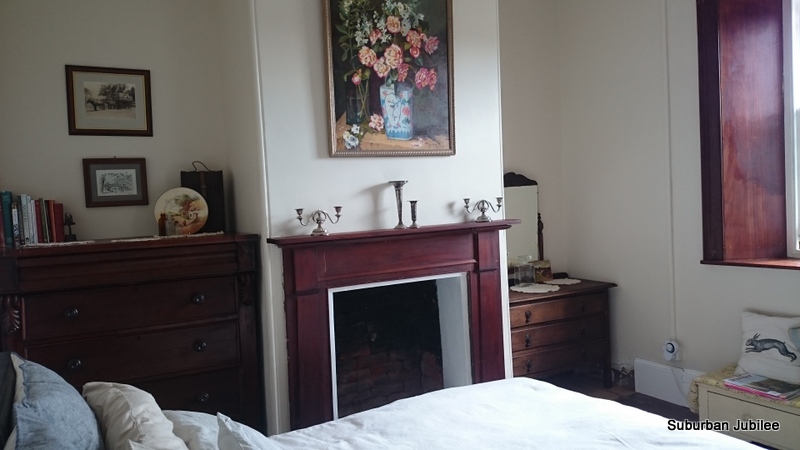
The walls were then also coated with BIN Zinser including the hearth stone. After painting it was so exciting to be finally able to move furniture in. You may remember the story about the cedar wardrobe in our room (here), well we had a similar thing with this chest of drawers. An exact fit but without the architrave and we had to employ the ottoman on wheels method to manoeuvre it into place and drop it down behind the fireplace architraving.  


Just made for the space and a very opportune find. It needs some restoration work but for now a loving coat of oil and the guests will just bear with it for the time being as we have run out of time.  


The mantelpiece, the window and the door, all Tasmanian cedar, have been stripped of the candy pink paint and oiled and shellacked. The room is light and bright with warm wood tones. We also acquired the little chest of drawers on the other side of the chimney space, another perfect fit. 


A bit more wood oil and some artwork on the walls and it looks nothing like the sad little pink and maroon bedroom that no-one could bear to be in for more than a few minutes.


This little drawer that was the base of an old wardrobe has come in handy as another "blanket box" for storing extra quilts and throws and fits neatly beneath the window. 


There is still some work to do on the floors which will in all likelihood be re-done with tung oil but that must wait till next year now. There is also a tiny amount of architrave that we need to source too.


We have tried to keep things as natural as possible and preserve where we can. These original Georgian boards are typical in width and pit sawn and fixed with hand forged nails. They are for the most part holding up just beautifully and we'll live with that.
We've had a lot of wins but this is our biggest achievement I think. I now consider myself something of an expert in cat remediation and I have the black light to prove it! LOL


Monday, October 10, 2016

Not Too Fowl


Welcome to the new chook yard, come on in and let me show you our latest project.
It's very rustic and recycled but the girls seem happy.


Our dear old ladies still have the run of the paddock but we will be getting some day olds soon and we wanted a smaller enclosure for them to grow up in and occasionally it might be handy to have the flock contained anyway.


Do you remember the falling down shed that we renovated? We have the fowl house located at the right hand side and the nesting box protruding into the main shed with an easy access lift up lid and vermin proof feed store. There is also a door for the human cleaners to enter and easily shovel and clean the nice new cement floor.


Adjacent to the fowl house is this quince thicket that provides the ladies with cool shade and shelter and they can dive for cover here when they feel threatened by overhead larger birds of prey.


At the moment it is in blousy pale pink bloom and a beautiful quiet retreat this human too.


We have literally made it from scrap, utilising the rolls of recycled wire we already had (which dictated the height!) and the reclaimed timber from many sources including an old picnic table set. In a couple of the photos you will have spied a plastic covered structure that we now call the "poly-tunnel". In it's previous life it was the "cat cage".


The previous owners had it attached to the side of the house for their dozen plus cats to have outdoor time. Above left is one of the first photos of the yard when we moved in. The tunnel is reinforced and covered and large enough to stand upright in and will be invaluable for bringing frost tender plants on to advancement for our short growing season.


It serves a dual purpose being incorporated into the fowl yard fence line. It is firmly screwed into/between the cemented fence posts making it very secure in high winds and it becomes part of the fence itself saving us more building materials. On the back of the poly-tunnel we are building compost piles.


I've been looking for the right building project for years to be able to use these reclaimed mouldings. A bit of whimsy and definition for the yard making it a little more decorative and less utilitarian.


I'm loving the views from my kitchen window and everything is finally taking shape, getting tidied up and finding it's place.


Related Posts Plugin for WordPress, Blogger...