Are you ready for another before and after?
We've had a massive push on in the front room to get it ready for family flying in for Christmas. This is one room that I thought we would never have a win.
Back in June, just walking in her would crush me and shake all my confidence despite the success in the rest of the house. This was the room, that despite dozens of layers of protein breaking solution, still smelled over-powering of cat urine. You may recall we had previously dubbed this room the "pissoir"
No longer!
Victory!
But you know the saying "no gain without pain", it's true and this room is testament to how thorough and assiduous you have to be when dealing with this type of animal damage.
There is a previous post
here about the removal of part of the walls and it has great construction reference photos, and here the remediation story continues.
So after all the scratch coats and a final top coat and a couple more weeks drying, the walls were ready to continue on with. Taking out those sections of render made a huge difference to the smell BUT I just knew we needed to go further and remove the skirting boards and remediate them also.
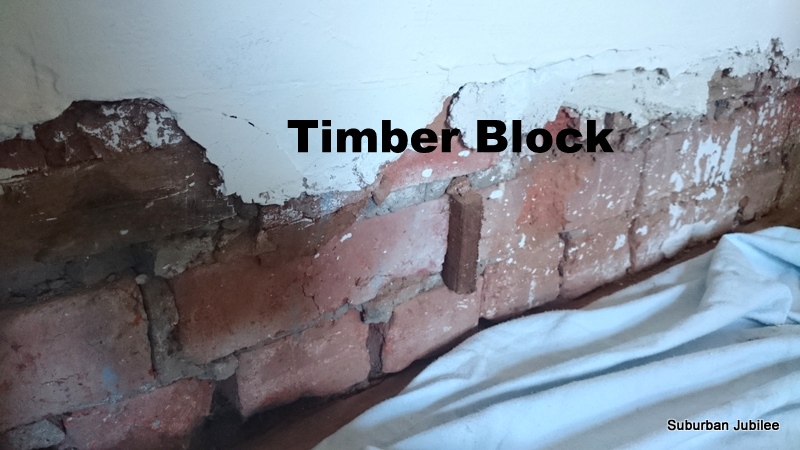
This was a big decision because we would risk damaging them and also faced the daunting task of re-attaching them. So here is what we found beneath. The clever builders place blocks/wedges of wood periodically between the bricks to give the nails a place to hold to.
Above is the outer wall showing the bluestone foundations and the timber for the skirting boards to affix to. It turns out the skirting boards (about 10" deep) are made from Australian cedar. It broke our hearts to have to treat them so ruthlessly but we had to scrub them about four times including the back and sides with enzyme solution to neutralise the urine that had gone down the walls and behind them. Then after thoroughly drying, they were coated on all sides with BIN Zinser, a special shellac based primer. They were then carefully re-attached with a rubber mallet and utilising as many of the original hand made nails as possible.

The walls were then also coated with BIN Zinser including the hearth stone. After painting it was so exciting to be finally able to move furniture in. You may remember the story about the cedar wardrobe in our room (
here), well we had a similar thing with this chest of drawers. An exact fit but without the architrave and we had to employ the ottoman on wheels method to manoeuvre it into place and drop it down behind the fireplace architraving.
Just made for the space and a very opportune find. It needs some restoration work but for now a loving coat of oil and the guests will just bear with it for the time being as we have run out of time.
The mantelpiece, the window and the door, all Tasmanian cedar, have been stripped of the candy pink paint and oiled and shellacked. The room is light and bright with warm wood tones. We also acquired the little chest of drawers on the other side of the chimney space, another perfect fit.
A bit more wood oil and some artwork on the walls and it looks nothing like the sad little pink and maroon bedroom that no-one could bear to be in for more than a few minutes.
This little drawer that was the base of an old wardrobe has come in handy as another "blanket box" for storing extra quilts and throws and fits neatly beneath the window.
There is still some work to do on the floors which will in all likelihood be re-done with tung oil but that must wait till next year now. There is also a tiny amount of architrave that we need to source too.
We have tried to keep things as natural as possible and preserve where we can. These original Georgian boards are typical in width and pit sawn and fixed with hand forged nails. They are for the most part holding up just beautifully and we'll live with that.
We've had a lot of wins but this is our biggest achievement I think. I now consider myself something of an expert in cat remediation and I have the black light to prove it! LOL
-